Mappe e Geocoding
In questa lezione impareremo ad utilizzare il geocoding e le mappe per inserirle nei progetti Web.
Geocoding
Per geocoding si intende una coppia di servizi:
- geocoding: dato un indirizzo/luogo recuperare le coordinate geografiche (latitudine-longitudine);
- reverse geocoding: date delle coordinate recuperare l’indirizzo.
Questo servizio è fornito da Geoapify, un servizio gratuito per piccoli progetti (non solo didattici).
Per poter usare questo servizio occorre procurarsi una chiave API, un token personale che permette di identificare l’utente (programmatore) che svolge la richiesta (le risorse sono infatti limitate in quanto gratuite, la società che sviluppa il prodotto usa il token per dare un accesso ad un numero limitato di chiamate giornaliere al servizio).
Per ottenere la chiave API, cliccare su questo link: https://myprojects.geoapify.com/login
Una volta ottenuta la chiave che memorizzeremo in una variabile MYAPIKEY proseguiamo.
Da indirizzo a coordinate
La URL della chiamata ha la seguente struttura:
https://api.geoapify.com/v1/geocode/search?text=$INDIRIZZO&apiKey=MYAPIKEYIl risultato (popolato con un indirizzo reale e una api key valida) avrà questa struttura:
{
  "type": "FeatureCollection",
  "features": [
    {
      "type": "Feature",
      "properties": {
        "datasource": {
          "sourcename": "openstreetmap",
          "attribution": "© OpenStreetMap contributors",
          "license": "Open Database License",
          "url": "https://www.openstreetmap.org/copyright"
        },
        "country": "Italy",
        "country_code": "it",
        "state": "Lombardy",
        "county": "Milan",
        "city": "Milan",
        "postcode": "20132",
        "suburb": "Parco Lambro - Cimiano",
        "street": "Via Crescenzago",
        "housenumber": "110",
        "iso3166_2": "IT-25",
        "iso3166_2_sublevel": "IT-MI",
        "lon": 9.2399599,
        "lat": 45.4965497,
        "state_code": "LOM",
        "result_type": "building",
        "formatted": "Via Crescenzago, 110, 20132 Milan MI, Italy",
        "address_line1": "Via Crescenzago, 110",
        "address_line2": "20132 Milan MI, Italy",
        "timezone": {
          "name": "Europe/Rome",
          "offset_STD": "+01:00",
          "offset_STD_seconds": 3600,
          "offset_DST": "+02:00",
          "offset_DST_seconds": 7200,
          "abbreviation_STD": "CET",
          "abbreviation_DST": "CEST"
        },
        "plus_code": "8FQFF6WQ+JX",
        "plus_code_short": "F6WQ+JX Milan, Italy",
        "rank": {
          "importance": 0.00000999999999995449,
          "popularity": 7.597684354865789,
          "confidence": 0.75,
          "confidence_city_level": 0.75,
          "confidence_street_level": 0.75,
          "confidence_building_level": 0.75,
          "match_type": "full_match"
        },
        "place_id": "51efb32506dc7a224059582bc9f08ebf4640f00103f90135f88aa802000000c00203"
      },
      "geometry": {
        "type": "Point",
        "coordinates": [
          9.2399599,
          45.4965497
        ]
      },
      "bbox": [
        9.2399099,
        45.4964997,
        9.2400099,
        45.4965997
      ]
    }
  ],
  "query": {
    "text": "via Crescenzago 110 Milano",
    "parsed": {
      "housenumber": "110",
      "street": "via crescenzago",
      "city": "milano",
      "expected_type": "building"
    }
  }
}
Per recuperare i dati quindi scriviamo questo codice:
const getCoords = async (address) => {
  let url = "https://api.geoapify.com/v1/geocode/search?text=$INDIRIZZO&apiKey=MYAPIKEY";
  url = url.replace("$INDIRIZZO", address);
  const response = await fetch(url);
  const data = await response.json();
  return {
    lat: data.features[0].properties.lat,
    lon: data.features[0].properties.lon
  }
}
Si ricorda che è una funzione async, quindi una promise. Inoltre il risultato può contenere più di un indirizzo, per semplicità abbiamo scelto il primo (features[0]).
Da coordinate ad indirizzo
Può essere utile anche la funzione opposta
https://api.geoapify.com/v1/geocode/reverse?lat=$LAT&lon$LON&apiKey=MYAPIKEYIl risultato (popolato con un indirizzo reale e una api key valida) avrà questa struttura:
{
  "type": "FeatureCollection",
  "features": [
    {
      "type": "Feature",
      "properties": {
        "datasource": {
          "sourcename": "openstreetmap",
          "attribution": "© OpenStreetMap contributors",
          "license": "Open Database License",
          "url": "https://www.openstreetmap.org/copyright"
        },
        "country": "Italy",
        "country_code": "it",
        "state": "Lombardy",
        "county": "Milan",
        "city": "Milan",
        "postcode": "20132",
        "suburb": "Parco Lambro - Cimiano",
        "street": "Via Crescenzago",
        "housenumber": "110",
        "iso3166_2": "IT-25",
        "iso3166_2_sublevel": "IT-MI",
        "lon": 9.2399599,
        "lat": 45.4965497,
        "state_code": "LOM",
        "distance": 0,
        "result_type": "building",
        "formatted": "Via Crescenzago, 110, 20132 Milan MI, Italy",
        "address_line1": "Via Crescenzago, 110",
        "address_line2": "20132 Milan MI, Italy",
        "timezone": {
          "name": "Europe/Rome",
          "offset_STD": "+01:00",
          "offset_STD_seconds": 3600,
          "offset_DST": "+02:00",
          "offset_DST_seconds": 7200,
          "abbreviation_STD": "CET",
          "abbreviation_DST": "CEST"
        },
        "plus_code": "8FQFF6WQ+JX",
        "plus_code_short": "F6WQ+JX Milan, Italy",
        "rank": {
          "importance": 0.00000999999999995449,
          "popularity": 7.597684354865789
        },
        "place_id": "51efb32506dc7a224059582bc9f08ebf4640f00103f90135f88aa802000000c00203"
      },
      "geometry": {
        "type": "Point",
        "coordinates": [
          9.2399599,
          45.4965497
        ]
      },
      "bbox": [
        9.2399099,
        45.4964997,
        9.2400099,
        45.4965997
      ]
    }
  ],
  "query": {
    "lat": 45.4965497,
    "lon": 9.2399599,
    "plus_code": "8FQFF6WQ+JX"
  }
}
Qui il codice per recuperare l’indirizzo completo:
const getCoords = async (coordinates) => {
  let url = "https://api.geoapify.com/v1/geocode/reverse?lat=$LAT&lon$LON&apiKey=MYAPIKEY";
  url = url.replace("$LAT", coordinates.lat);
  url = url.replace("$LON", coordinates.lon);
  const response = await fetch(url);
  const data = await response.json();
  return data.features[0].properties.formatted;
}
Ma come si può vedere sono molti i campi interessanti, come la città, la nazione, il quartiere, il CAP, e l’indirizzo espresso su più righe.
Mappe
Per le mappe useremo la libreria Leaflet, che si basa su OpenStreetMaps, un sistema di mappe gratuito ed open source, che non richiede chiavi nè tantomeno pagamenti.
Per utilizzare Leaflet bisogna predisporre la pagina HTML includendo JS e CSS in head:
<head>
...
<link rel="stylesheet" href="https://unpkg.com/leaflet@1.9.4/dist/leaflet.css"
     integrity="sha256-p4NxAoJBhIIN+hmNHrzRCf9tD/miZyoHS5obTRR9BMY="
     crossorigin=""/>
 <script src="https://unpkg.com/leaflet@1.9.4/dist/leaflet.js"
     integrity="sha256-20nQCchB9co0qIjJZRGuk2/Z9VM+kNiyxNV1lvTlZBo="
     crossorigin=""></script>
</head>
Nel body è necessario poi un elemento contenitore:
<div id="map"></div>e nel CSS non dimenticarsi di dare una altezza alla mappa:
#map {
  height: 800px;
}
A questo punto passiamo al Javascript.
Per creare una mappa scriviamo:
const map = L.map('map';
map.setView([lat, lon]), zoom);
L.tileLayer('https://tile.openstreetmap.org/{z}/{x}/{y}.png', {
         maxZoom: 19,
         attribution: '© <a href="http://www.openstreetmap.org/copyright">OpenStreetMap</a>'
      }).addTo(map);
Dove lat e lon sono latitudine e longitudine, e zoom il livello di zoom, da 1 (mappa mondiale) a 19 (zoom a livello edificio). Su Leaflet sono disponibili diversi tipi di “tile” per avere la mappa terreno o satellitare.
Possiamo anche aggiungere un marker per selezionare un punto sulla mappa:
let marker = L.marker([lat, lon]).addTo(map);ed associargli anche un popup, un fumetto con la descrizione del marcatore:
const popup = marker.bindPopup("<b>Place selected</b><br>Sono un fumetto");
popup.openPopup();
La seconda istruzione (openPopup()) non è obbligatoria, il popup si apre da solo al click sul marcatore.
La mappa è cliccabile, ed il click è gestibile in questo modo:
map.on('click', (e) => {
      console.log(e.latlng);
}
dove e.latlng è un dizionario {lat: XX, lng: YY}.
Ad esempio possiamo aprire un popup sul punto cliccato:
map.on('click', (e) => {
 L.popup()
   .setLatLng(e.latlng)
   .setContent("You clicked the map at " + e.latlng.toString())
   .openOn(map);
});
oppure creare un marcatore:
map.on('click', (e) => {
  const place = e.latlng;
  L.marker([place.lat, place.lng]).addTo(map);
});
Una app di esempio
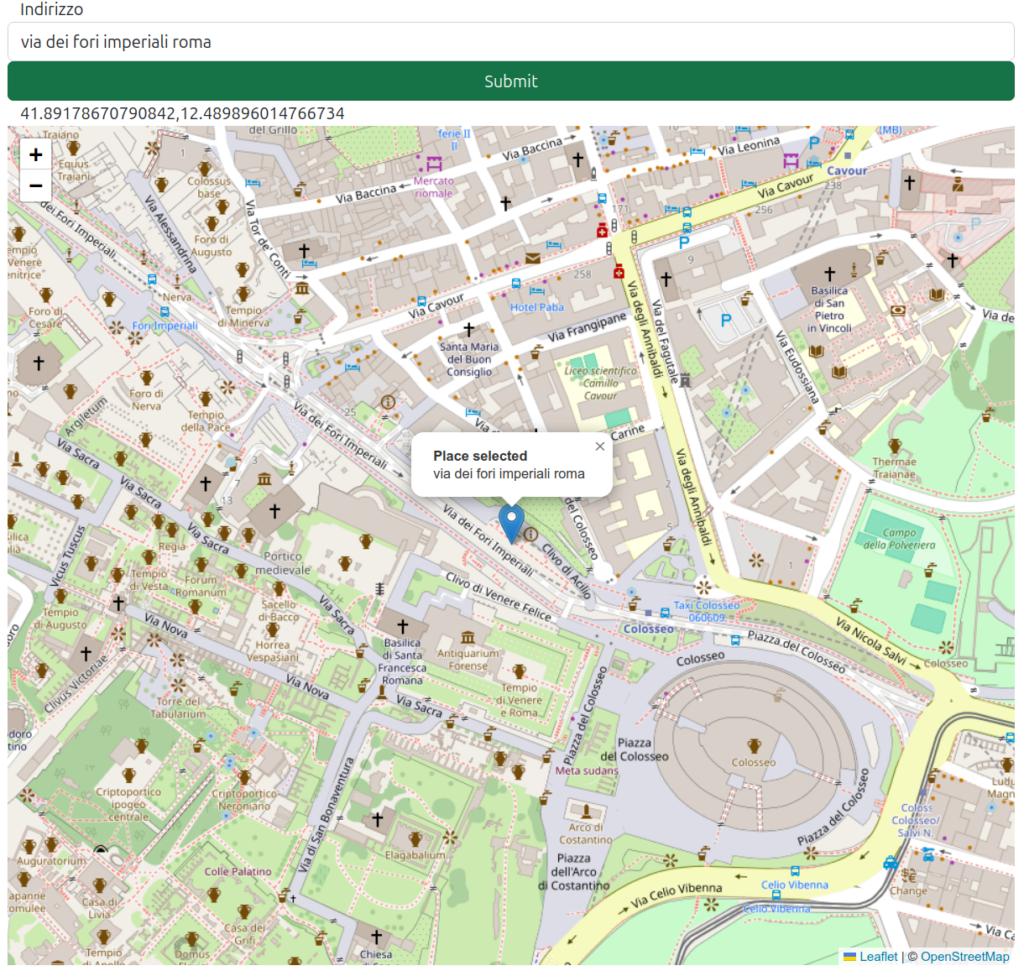
Concludiamo la lezione mostrando una piccola applicazione Web che richiede un indirizzo all’utente e crea una mappa con marcatore centrato nel punto indicato dall’utente. Questo esempio combina quindi geocoding e mappe.
Html:
<!doctype html>
<html lang="en">

<head>
   <meta charset="utf-8">
   <meta name="viewport" content="width=device-width, initial-scale=1">
   <title>Mappe</title>
   <link rel="stylesheet" href="index.css">
   <link href="https://cdn.jsdelivr.net/npm/bootstrap@5.2.3/dist/css/bootstrap.min.css" rel="stylesheet"
      integrity="sha384-rbsA2VBKQhggwzxH7pPCaAqO46MgnOM80zW1RWuH61DGLwZJEdK2Kadq2F9CUG65" crossorigin="anonymous">
   <link rel="stylesheet" href="https://unpkg.com/leaflet@1.9.4/dist/leaflet.css"
      integrity="sha256-p4NxAoJBhIIN+hmNHrzRCf9tD/miZyoHS5obTRR9BMY=" crossorigin="" />
</head>
<body>
   <div class="container">
      <div class="row">
         <label for="address">Indirizzo</label>
         <input id="address" type="text" class="form-control">
         <button id="button" type="button" class="btn btn-success">Submit</button>
      </div>
      <div class="row">
         <div id="output"></div>
      </div>
      <div class="row">
         <div id="map"></div>
      </div>
   </div>
   </div>
   <script src="https://unpkg.com/leaflet@1.9.4/dist/leaflet.js"
      integrity="sha256-20nQCchB9co0qIjJZRGuk2/Z9VM+kNiyxNV1lvTlZBo=" crossorigin=""></script>
   <script src="https://cdn.jsdelivr.net/npm/bootstrap@5.2.3/dist/js/bootstrap.bundle.min.js"
      integrity="sha384-kenU1KFdBIe4zVF0s0G1M5b4hcpxyD9F7jL+jjXkk+Q2h455rYXK/7HAuoJl+0I4"
      crossorigin="anonymous"></script>
   <script src="index.js"></script>
</body>
</html>
Javascript:
const getCoords = async (address) => {
   let url = "https://api.geoapify.com/v1/geocode/search?text=$INDIRIZZO&apiKey=MYAPIKEY";
   url = url.replace("$INDIRIZZO", address);
   url = url.replace("MYAPIKEY", MYAPIKEY);
   const response = await fetch(url);
   const data = await response.json();
   return {
      lat: data.features[0].properties.lat,
      lon: data.features[0].properties.lon
   }
}

(async () => {
   const address = document.querySelector("#address");
   const button = document.querySelector("#button");
   let map = L.map('map')
   button.onclick = async () => {
      let coords = await getCoords(address.value);
      document.querySelector("#output").innerText = coords.lat + "," + coords.lon;
      const zoom = 18;
      map.setView([coords.lat, coords.lon], zoom);
      L.tileLayer('https://tile.openstreetmap.org/{z}/{x}/{y}.png', {
         maxZoom: 19,
         attribution: '© <a href="http://www.openstreetmap.org/copyright">OpenStreetMap</a>'
      }).addTo(map);
      let marker = L.marker([coords.lat, coords.lon]).addTo(map);
      marker.bindPopup("<b>Place selected</b><br>" + address.value).openPopup();
   }
})();
Qui uno screenshot di utilizzo: